

 |
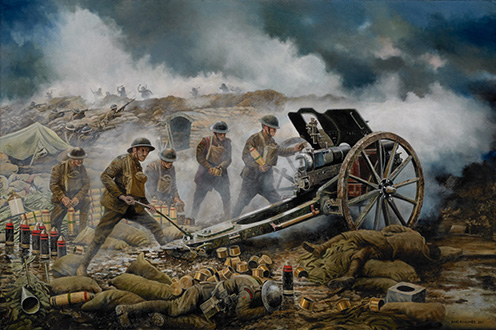
Sergeant CE Gourley VC MM at the Battle of Cambrai, 30th November 1917 Near Epehy, during the Battle of Cambrai, Sergeant Cyril Gourley MM commanded a section of 4.5in howitzers of D (Howitzer) Battery, 276th Brigade Royal Field Artillery, 55th (West Lancashire) Division. The sections officer, Lt HR Ridealgh MC, was wounded early in the action, and Sgt Gourley kept the guns manned throughout that day, supporting the 1st/6th Battalion (Rifles), The Kings (Liverpool) Regiment whilst under direct infantry and artillery attack. Although having to shelter at times due to the enemy assaults, he always returned to the guns, leading the men who volunteered to go with him. Sgt Gourley was awarded the Victoria Cross for valour in the face of the enemy. The following decorations were also awarded: the Military Cross to Lt WM Biggart; the Distinguished Conduct Medal to Sgt EJ Thornley and Bdr T Edge; and the Military Medal to Cpl FS Howard, Bdr JA Pinnington, Gnrs RC Evans, F Backhouse, C Hartley, TA Jevons, C Oliver and ASG Oram. Gnr W Faux, who was wounded early during the action, was also mentioned for his bravery in the official report. This painting depicts Sgt Gourley at his gun, supported by Sgt Thornley, Bdr Edge, Gnr Hartley and Gnr Oliver. A gun detachment normally consisted of 6 men. In this scene, the breech is closed; the gun is loaded and ready to fire. Sgt Gourley, the No1, is directing his gun at the next target by operating the trail lever. The Number 2, to the right of the gun, would normally operate the breech, but as he lies dead the drill prescribed that the No1 takes over that role as well. Sgt Gourley will shortly run forward, shouting Fire and the No 4 (the loader) who is already poised, will pull the firing button; he is holding the next shell and as soon as the No1 pulls the handle to open the breech he will insert it. With a reduced detachment, the No 4 also pushes the shell home with the rammer. He will then pick up or be handed a cartridge and push it in with his fist. Normally the gun layer (No3) looked through the No7 dial sight to find the target. However, the Germans were almost upon them; the gunners were hastily firing over open sights at very short range. There was no need to lay the gun. What was required was a rapid supply of ammunition to the loader, so the No3 became one of the ammunition numbers and stands ready to hand the loader the brass cartridge which will follow the shell into the breech. A mixture of shrapnel shells (black, with red painted rings) and high explosive shells (yellow) are stacked beside the gun trail. After being fired, empty brass cartridge cases came out under the trail and would be kicked away. Major Hudson, the battery commander, stated in his report that the section were firing over open sights at the enemy who were in full view. They were firing rounds with 106 fuse. (This is a direct-action detonating fuse which functions on impact, so they must have been firing HE shells. This fuse would not work with a shrapnel shell). Following various changes in name, D/276th is now 208th (3rd West Lancashire) Battery of 103rd (Lancashire Artillery Volunteers) Regiment RA. Medium: Oil on Canvas Printed image size(s): B2 only (58 x 38 cm) Owner: 103rd (Lancashire Artillery Volunteers) Regiment Royal Artillery Price(s): £75 |